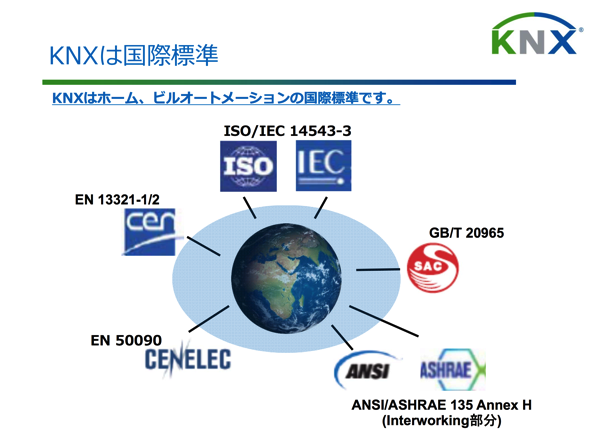
KNXの設定を行うETS5の操作方法のメモです。
プロジェクトの作成

ETS5を立ち上げ、緑色のプラスマークをクリックすると、「Create New Project」が立ち上がります。
表示されているとおりに入力したら「Create Project」のボタンを押します。

これが新しいプロジェクトを立ち上げた最初の画面です。
Add Building(構造を追加する)
ETSの中で、物理的な建物やフロア、部屋の構造を作成します。

先程作成した「NewProject」をマウスでクリックして選択した状態にします。

左上にある「Add Building Parts(構造の一部を追加する)」のボタンを押すと画面にウィンドウがあらわれます。そこに、「TrainingCenter」と入力してOKを押します。

「NewProject」の左にある矢印をクリックすると今追加した「TrainingCenter」が表示されます。

左上の「AdedFloor(フロアを追加する)」をクリックします。

Nameに「2F」と入力してOKをおします。
すると、2Fのフロアができます。
イメージ的には
NewProject
– TrainingCenter
— 2F
です。

「TrainingCenter」をクリックすると「2F」が表示されるのでこれを選択し、左上にある「Add Rooms(部屋を追加する)」を押します。

「TrainingRoom」が追加されました。

再度、「2F」を選択した状態で「Add Rooms(部屋を追加する)」をして、「Corridor(廊下)」を追加します。

今度は「Corridor(廊下)」を選択した状態で、左上の「Add Devices(デバイスを追加する)」の横にある矢印をクリックすると、Cabinets、Devices、Functionsがえらべるので、「Cabinets」を選びます。

ここに「ControlBox(制御盤)」をいれます。

以上で、建物の構造ができましたので、次はこれにデバイスを追加します。
デバイスの追加
デバイスは実際の現場で収めるのと同じイメージで追加します。
| 部屋 | 製品 |
|---|---|
| ControlBox | STV-0320.01 KNX Power Supply |
| KNX USB Interface | |
| DALI gateway TW | |
| Universal dimming actuator | |
| TrainingCenter | KN9551-KXX Push-button |

デバイスを追加するには、まずは「TrainingRoom」を選択した状態で、左上にある「Add Devices(デバイスを追加する)」ボタンをおします。
TrainingRoomには「KN9551-KXX Push-button」というスイッチを設置するので、カタログからこの製品を検索します。

Catalogウインドウの右の方に検索窓があるので、スイッチの型番の一部「9551」を入力すると該当する製品が表示されます。

表示された製品をクリックすると、右下に「Add」のボタンが出るのでこれをクリックすると、TrainingRoomにKNXのボタンが追加されます。

同様にCorridorにあるControlBoxの中にもKNX機器を追加します。

以上ですべてのデバイスの追加ができました。
デバイスのDescriptionに書き込む
このままだと追加したデバイスがわかりずらいので、デバイスを選択してDescriptionにわかりやすい説明を記載することをおすすめします。

「Building」ウインドウに表示されているデバイスをクリックすると、右側にPropertiesが表示されますので、ここのDescriptionにデバイスの内容を記載します。

PropertiesのDescriptionに書いた内容が反映されました。ここに表示されるとわかりやすいです。

他の機器にも記入しました。Buildingで2Fをクリックするとそこに設置されているデバイスが全て表示されます。