海外の友人から、SATEL社のUniversal monitoring module “GRPS-A”で使ってMQTTで監視と制御を行いたいとの相談をもらったのでやったことをまとめてみました。
I received a request from a friend overseas who wanted to use SATEL’s universal monitoring module “GRPS-A” for monitoring and control via MQTT, and this is what I did.
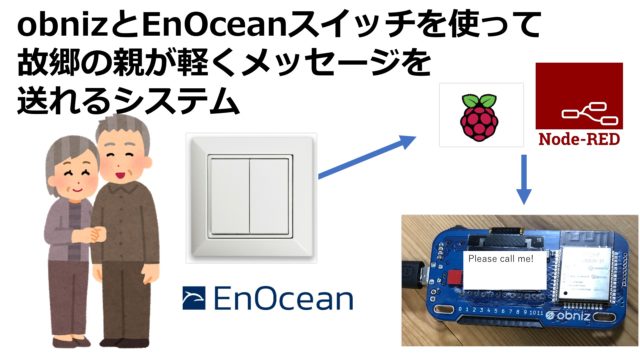
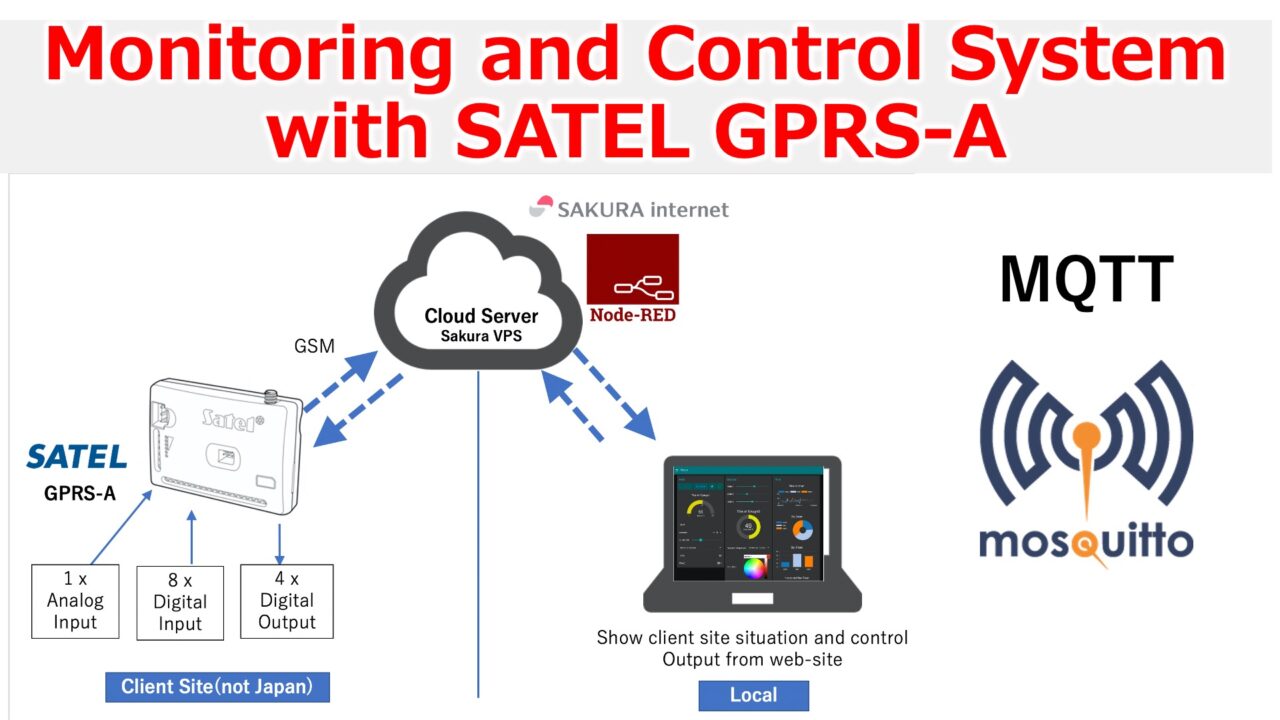
システム概要:System Overview

SATEL社のUniversal monitoring module “GRPS-A”にはGSM通信ができるSIMカードがあるので、それを現場に設置。
SATEL’s Universal monitoring module “GRPS-A” has a SIM card that allows GSM communication, so we installed it in the field.
SATEL – Mission-Critical Connectivity
8つのDigital Inputと4つのDigital Output、そして1つのセンサー用ライン(Analog Input)を使用。”GRPS-A”からMQTTでSakura VPSで動かすNode-REDにMQTTで通信。MQTTブローカーは友人が用意したものを利用。Node-RED側で受信データを整理して、Node-RED DashboardにDigital InputとOutputの情報を表示。Node-RED Dashboard上のボタンから、GPRS-AのOutputを制御。
こうすることで、Sakura VPS上のNode-REDにアクセスできれば、現場の監視と制御を行うことができるというシステムです。
It uses eight Digital Inputs, four Digital Outputs, and one sensor line (Analog Input). MQTT from “GRPS-A” to Node-RED running on Sakura VPS, using MQTT broker prepared by my friend, Node-RED organizes incoming data and displays Digital Input and Output information on Node-RED Dashboard. From the Node-RED Dashboard, you can control the output of GPRS-A with a button.
In this way, if you have access to Node-RED on the Sakura VPS, you can monitor and control the site.
Satel GX Softで現場のGPRS-Aの設定:Setting up GPRS-A in the field with Satel GX Soft
.jpg")
GX SoftはSatel社のデバイスを設定したり通信したりするソフトウェア。
GX Soft is software for configuring and communicating with Satel’s devices.
.jpg")
ソフトを立ち上げ、”CONNECTION”を設定することで、Localで接続するか、Remoteで接続するかを選べる。
By launching the software and setting “CONNECTION”, you can choose whether you want to connect locally or remotely.

SATEL serverを使ったRemote connectionにはGRPS-Aに搭載されたSIMのIMEIとIDを入力することで接続が可能です。
Remote connection using the SATEL server can be made by entering the IMEI and ID of the SIM installed in the GRPS-A.
MQTTの設定:MQTT configuration
.jpg")
MQTTの設定は、FUNCTIONS > IoTから可能で、ここに必要な項目を入力する。
MQTT configuration can be done from FUNCTIONS > IoT, where you can enter the necessary items.
Node-REDのフロー(全体):Flow of Node-RED (overall)

今回作成したNode-REDのフローはこちら。
Here is the Node-RED flow we created.

こちらがNode-RED Dashboard。状態については、1を緑、0を赤でボタンの色を変更させ、Output3のOn/Offボタンを設置しました。
Here’s the Node-RED Dashboard, where I’ve changed the color of the buttons to green for 1 and red for 0, and placed an On/Off button for Output3.
GPRS-Aから取得したデータの処理:Processing of data acquired from GPRS-A

まずはMQTT inノードでMQTTブローカーに接続。
First, connect to the MQTT broker with the MQTT in node.
ここでちょっとはまりました。
This is where I got a little stuck.
.jpg")
GXSoftのMQTTの設定には、”Publish topic”と”Subscribe topic”があり、この”Subscribe”の方はGPRS-Aのデバイスが受ける側のTopicでした。当たり前といえば当たり前なのですが、これに気づかず、サーバーのNode-REDでSubscribe側のTopicにして受信できずに、しばらくはまってました。
In GXSoft’s MQTT settings, there are “Publish topic” and “Subscribe topic”, and the “Subscribe” topic is the one that the GPRS-A device receives.It’s obvious, but I didn’t realize this and was stuck for a while, unable to receive the Topic on the subscribe side in Node-RED on the server.

MQTT inノードで受けたJSON文字列をjsonノードでObjectに変換。
The JSON string received by the MQTT in node is converted to an Object by the json node.

ちなみに取得するJSONはこんなフォーマットです。
The JSON to be retrieved is in this format.

オブジェクトをfunctionノードでイテレーションします。
Iterate over objects with function nodes.
var data = msg.payload;
var color = "";

for (const [key, value] of Object.entries(data)) {

    if ( value == 0 ) {
        color = "red";
    } else if ( value == 1) {
        color = "green";
    }

    msg.payload = key;
    msg.value = value;
    msg.background = color;

  node.send(msg);
}
valueが0のときはbuttonのbackgroundの色をred、1のときはgreenになるように、backgroundをつくりそこにcolorを代入。
Create a background and assign a color to it so that the background color of the button is red when value is 0 and green when value is 1.

Switchノードでパラメータごとに分岐し、その先にNode-RED Dashboardのボタンにつなげています。
We use a Switch node to branch for each parameter, and then connect it to a button on the Node-RED Dashboard.

ここは単純に、ボタンの色を変えるだけ。
Here, we simply change the color of the buttons.
Outputの制御:Control of Output

Output側のフローはこちら。
The flow on the Output side is here.

今回はOutput3しかつくっていないので、templateノードで作成。
Since we are only creating Output3 this time, we will create it in the template node.
["O3":1]
Output3を制御したい状態を送っています。
We are sending the state that we want to control Output3.
これを送るとGPRS-A側からレスポンスがきます。
When you send this, you will get a response from the GPRS-A side.

On(1)が正しく届いたとき。
When On(1) is received correctly.

Off(0)が正しく届いたとき。
When Off(0) is received correctly.
まとめ:conclusion
以上、Satel社のUniversal monitoring module “GRPS-A”をつかって、Sakura VPSで動かすNode-REDにデータを送り、Node-RED Dashboardに状態を表示、現場デバイスのOutputの制御をする方法をご紹介しました。
In this article, I explained you how to use Satel’s universal monitoring module “GRPS-A” to send data to Node-RED running on Sakura VPS, display the status on Node-RED Dashboard, and control the output of devices in the field. I also showed how to control the output of devices in the field.
あとは、VPS側にデータベースのInfluxDBや、VisualツールのGrafanaなどを入れることで、時系列でのデータ保存や、見栄えを良くすることなどができますね。
By adding InfluxDB database and Grafana visual tool to the VPS side, we can save data in chronological order and improve the appearance of the data.
Satel社は日本では技適の関係で使えませんが、海外物件での設備監視にはこれからも頻繁に利用機会がありそうです。
Satel’s products cannot be used in Japan due to TELEC regulations, but we will have frequent opportunities to use them for equipment monitoring in overseas properties.