スマートホーム&ビルディング管理システムComfortClick社のbOSで高齢者向けのサンプルプロジェクトが公開されていたので、bOS Configuratorにこのプロジェクトをインポートして確認してみます。
↓ bOS製品はComfortClick社日本代理店のスマートライト株式会社まで
スマートライト株式会社
Themeの確認
パネル背景

これが今回のサンプルプロジェクトのパネルの一番上。

これは新規でパネルをいれたときの状態。
まずは、この新規パネルをサンプルプロジェクトと同じようにPropertiesをいじっていきます。
.jpg")
変更したのは”Appearance/Background ImageをEmptyにしただけでした。
フレーム
.jpg")
次はフレームです。
.jpg")
上にある”+ Frame”を押すとフレームが挿入されます。

左のサンプルプロジェクトとデフォルトで入れたフレームのプロパティを並べました。
これを変更することで、サンプルプロジェクトのようになるはずです。

これでフレームができました。
ボタン
.jpg")
Themeのトップのパネルには各機能別パネルにリンクするためのボタンが並んでいます。
.jpg")
このボタンはパネルリンクになるので、先にリンク先のパネルを作る必要があります。
パネル(Light)

Lightのパネルです。
.jpg")
TESTにも”+”アイコンを押して新しいPanelを追加します。

デフォルトのPanelが追加されたので、Propetiesを変更します。
.jpg")
フレーム(Light)
これにフレームを追加します。

サンプルプロジェクトのフレームのプロパティと同じように変更します。

フレームが入りました。
フレーム(Light:上段)
.jpg")
この部分もフレームになっています。

こちらがフレームのプロパティ。
ボタン(Light:1段目)
.jpg")
1段目にはボタンが3つあります。それぞれのプロパティを確認。

一番左のブランク部分。

真ん中のHome部分。

右側の”More”の部分。

上段のフレームが入りました。
ボタン(Light:2段目)
.jpg")
左側のLight 1ボタンについて。

“Value”が、Devices¥Templates¥Lights¥Light 1.Valueとなっているので、TESTの方もDevicesからドラッグ&ドロップします。

サンプルとちょっと違うので、プロパティを確認します。

AppearanceがTESTの方はAutomaticになっているので、ここをManualにして修正します。
.jpg")
同じようにやったのですが、下のバーの部分が変わりません。なぜだ?
Themeからリンク
.jpg")
このままだと、bOS Clientから今作成した、Themes¥TEST¥Lightsにいけないので、”Bed”をTEST¥LightsへのPanel Linkにします。
.jpg")
ここをThemes¥TEST¥Lightsにします。

これだとうまくいきません。
.jpg")
HomeにあったBedを削除して、先程TESTにあったLightをLight3という名前にして、移動してみます。
.jpg")
ここをクリックすると
.jpg")
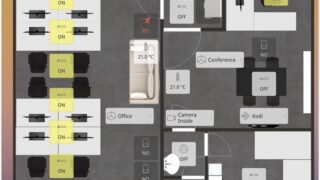
無事にパネルが表示されました。
また、下にあるメニューアイコンも自動的に挿入されています。
まとめ
ComfortClicks社のbOSは、サーバーに遠隔地からアクセスできれば、操作ももちろん、Configuratorを使って設定もできるのが便利なところです。
ただし、機能がたくさんあるので、使い方を覚えるのが一苦労ですね。