今年のGWにBabylon.jsのHello World!をローカル環境で実行しましたという記事を書いてから、その後、babylon.jsに触れておらず、久しぶりにやろうとおもったら完全に忘れていたので、まずはMacのローカル環境で動かす方法をメモとして残しておきます。
VScodeでフォルダ&ファイルを作成

まずは、”tutorial-01″というフォルダをつくります。

VScodeのファイルメニューから”フォルダーを開く”でこのフォルダーを開きます。
上のスクリーンショットのとおりに、index.htmlとjsフォルダー下にmain.jsファイルを作成します。
index.htmlファイル
<!DOCTYPE html>
<html>
    <head>
        <title>aaa</title>
        <style>
            canvas {
                width: 100%;
                height: 100%;
            }
            html, body {
                margin: 0;
            }

        </style>
    </head>
    <body>
        <canvas id="renderCanvas"></canvas>
        <script src="https://cdn.babylonjs.com/babylon.js"></script>
        <script src="https://cdn.babylonjs.com/viewer/babylon.viewer.js"></script>
        <script src="js/main.js"></script>
    </body>
</html>
index.htmlファイルは上記コードをコピペして保存。
main.js
console.log('hello world');

// get our canvas
const canvas = document.getElementById('renderCanvas');

// create a BabylonJS engine
const engine = new BABYLON.Engine(canvas, true);

// create a scene
function createScene() {
    // create a scene
    const scene = new BABYLON.Scene(engine);

    // create a camera
    const camera = new BABYLON.FreeCamera('camera', new BABYLON.Vector3(0,0,-10),scene);
    camera.attachControl(canvas, true);
    // create a light
    const light = new BABYLON.HemisphericLight('light', new BABYLON.Vector3(0,1,0),scene);

    // create a box
    const box = BABYLON.MeshBuilder.CreateBox('box', {
        size : 1
    }, scene);

    // create a sphere
    const sphere = BABYLON.MeshBuilder.CreateSphere('sphere', {
        segments: 32,
        diameter: 2,
    }, scene);
    sphere.position = new BABYLON.Vector3(3,0,0);

    // create a plane
    const plane = BABYLON.MeshBuilder.CreatePlane('plane',{},scene);
    plane.position = new BABYLON.Vector3(-3,0,0);
    return scene;

}

// create our scene

const scene = createScene();

engine.runRenderLoop(() => {
    scene.render();

});
Main.jsはこちらのコードをコピペして保存。
Live Serverという拡張機能をインストール

VScodeのLive Serverという拡張機能をインストールします。
Live Serverの実行

エクスプローラーでindex.htmlをクリック。

“表示”から”コマンドパレット”をクリック。

“Live server”と入力し、”Open with Live Server”をクリックします。

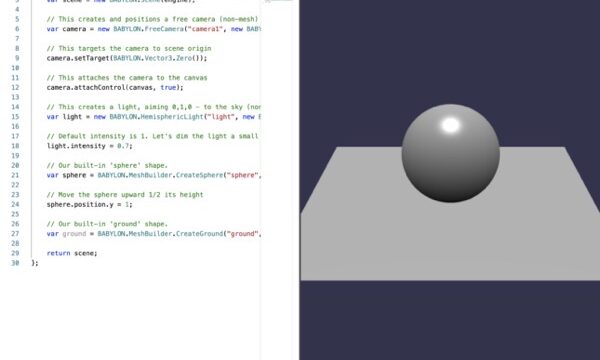
すると、自動的にブラウザで127.0.0.1:5500/index.htmlが開き、Babylon.jsのhello world画面が表示されます。
まとめ
Babylon.jsは以上のように簡単にローカル環境で実行できるので、まずはここから初めて、いろいろできることを学んでいきたいとおもいます。